Category:Predicting the occurrence of oil and gas traps
Jump to navigation
Jump to search
(previous page) (next page)
Articles about the methods we use to explore for traps.
Pages in category "Predicting the occurrence of oil and gas traps"
The following 59 pages are in this category, out of 259 total.
(previous page) (next page)S
- Sequences during moderate-amplitude, high-frequency cycles
- Setting and structure of the Sorrento field
- Siliceous microfossils
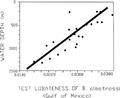
- Sorrento field: water saturation
- Special field techniques
- Spontaneous potential logs in water resistivity calculation
- Stable isotope stratigraphy
- Strain analysis of top seals
- Stratigraphic and geographic distribution of fossils
- Stratigraphic trap
- Stratigraphic trap seals
- Structural analogies
- Structural domains
- Structural exploration workflow
- Structural exploration: location selection
- Structural exploration: thrust belt example
- Structural fairway prospectivity
- Structural geology fieldwork
- Structural interpretation techniques and tools
- Structural lead and prospect delineation
- Structural maps and cross sections
- Structural play geology
- Structural styles: data and techniques for evaluation
- Surface geochemical exploration for petroleum
- Surface geochemical exploration: assumptions
- Surficial geochemical case histories
- Surficial geochemical case history 1: structural traps
- Surficial geochemical case history 2: stratigraphic trap
- Surficial geochemical case history 3: Predrill–postdrill comparison
- Surficial geochemical exploration principles
- Surficial geochemical interpretation guidelines
- Surficial geochemical survey objectives
- Surficial geochemistry and hydrocarbon detection methods
- Surficial geochemistry: limitations and uncertainties
- Synthetic seismograms: correlation to other data
T
- Taphonomy and provenance
- Techniques for enhancing seismic facies analysis
- Tectonic modeling
- Tectonic setting
- Temporal and environmental distribution of microfossils
- Thermal maturation
- Third-order sequences
- Top and fault seal evaluation
- Top seal displacement pressure
- Top seal ductility estimation
- Top seal integrity: Central Graben example
- Top seal strain estimation
- Trap geometry: changes
- Trap leakage
- Trap spillage
- Traps in a framework of sequence stratigraphy
- True resistivity determination
- Types of diagenetic traps
Media in category "Predicting the occurrence of oil and gas traps"
The following 200 files are in this category, out of 321 total.
(previous page) (next page) Applied-paleontology fig17-1.png 1,612 × 341; 56 KB
 Applied-paleontology fig17-10.png 1,636 × 319; 76 KB
 Applied-paleontology fig17-11.png 1,528 × 352; 49 KB
 Applied-paleontology fig17-12.png 1,580 × 348; 64 KB
 Applied-paleontology fig17-13.png 1,665 × 1,093; 164 KB
 Applied-paleontology fig17-14.png 1,077 × 478; 20 KB
 Applied-paleontology fig17-15.png 589 × 535; 25 KB
 Applied-paleontology fig17-16.png 550 × 423; 16 KB
 Applied-paleontology fig17-17.png 1,054 × 1,439; 140 KB
 Applied-paleontology fig17-18.png 1,428 × 1,138; 91 KB
 Applied-paleontology fig17-19.png 1,054 × 1,727; 356 KB
 Applied-paleontology fig17-2.png 1,626 × 344; 60 KB
 Applied-paleontology fig17-20.png 1,656 × 1,639; 374 KB
 Applied-paleontology fig17-21.png 1,361 × 803; 108 KB
 Applied-paleontology fig17-22.png 1,090 × 718; 47 KB
 Applied-paleontology fig17-23.png 1,637 × 1,069; 648 KB
 Applied-paleontology fig17-24.png 1,636 × 848; 655 KB
 Applied-paleontology fig17-25.png 1,660 × 1,207; 897 KB
 Applied-paleontology fig17-26.png 1,627 × 865; 687 KB
 Applied-paleontology fig17-27.png 1,055 × 752; 50 KB
 Applied-paleontology fig17-28.png 912 × 783; 206 KB
 Applied-paleontology fig17-29.png 773 × 1,259; 209 KB
 Applied-paleontology fig17-3.png 1,604 × 325; 61 KB
 Applied-paleontology fig17-30.png 1,566 × 864; 407 KB
 Applied-paleontology fig17-31.png 1,655 × 921; 274 KB
 Applied-paleontology fig17-32.png 1,343 × 1,127; 254 KB
 Applied-paleontology fig17-33.png 769 × 1,312; 208 KB
 Applied-paleontology fig17-34.png 1,025 × 833; 127 KB
 Applied-paleontology fig17-4.png 1,551 × 355; 86 KB
 Applied-paleontology fig17-5.png 1,589 × 359; 80 KB
 Applied-paleontology fig17-6.png 1,558 × 358; 115 KB
 Applied-paleontology fig17-7.png 1,643 × 345; 53 KB
 Applied-paleontology fig17-8.png 1,592 × 349; 46 KB
 Applied-paleontology fig17-9.png 1,493 × 360; 47 KB
 Applying-gravity-in-petroleum-exploration fig15-1.png 1,525 × 394; 30 KB
 Applying-gravity-in-petroleum-exploration fig15-10.png 1,637 × 1,005; 370 KB
 Applying-gravity-in-petroleum-exploration fig15-11.png 1,380 × 572; 239 KB
 Applying-gravity-in-petroleum-exploration fig15-12.png 1,198 × 1,621; 92 KB
 Applying-gravity-in-petroleum-exploration fig15-13.png 1,483 × 1,758; 345 KB
 Applying-gravity-in-petroleum-exploration fig15-14.png 1,978 × 1,174; 239 KB
 Applying-gravity-in-petroleum-exploration fig15-15.png 2,042 × 1,421; 507 KB
 Applying-gravity-in-petroleum-exploration fig15-17.png 1,181 × 1,780; 134 KB
 Applying-gravity-in-petroleum-exploration fig15-2.png 969 × 588; 32 KB
 Applying-gravity-in-petroleum-exploration fig15-3.png 2,047 × 704; 935 KB
 Applying-gravity-in-petroleum-exploration fig15-4.png 1,412 × 1,194; 70 KB
 Applying-gravity-in-petroleum-exploration fig15-5.png 1,153 × 820; 143 KB
 Applying-gravity-in-petroleum-exploration fig15-6.png 986 × 786; 72 KB
 Applying-gravity-in-petroleum-exploration fig15-7.png 1,463 × 1,952; 1.37 MB
 Applying-gravity-in-petroleum-exploration fig15-8.png 1,616 × 1,772; 292 KB
 Applying-gravity-in-petroleum-exploration fig15-9.png 1,650 × 1,572; 339 KB
 Applying-magnetotellurics fig16-1.png 1,429 × 671; 637 KB
 Applying-magnetotellurics fig16-2.png 1,122 × 480; 250 KB
 Applying-magnetotellurics fig16-3.png 1,359 × 937; 433 KB
 Applying-magnetotellurics fig16-4.png 1,383 × 798; 221 KB
 Applying-magnetotellurics fig16-5.png 1,686 × 492; 623 KB
 Applying-magnetotellurics fig16-6.png 1,429 × 826; 525 KB
 Applying-magnetotellurics fig16-7.png 1,679 × 913; 1.21 MB
 Applying-magnetotellurics fig16-8.png 1,665 × 903; 825 KB
 Evaluating-top-and-fault-seal fig10-1.png 861 × 543; 28 KB
 Evaluating-top-and-fault-seal fig10-10.png 1,297 × 609; 40 KB
 Evaluating-top-and-fault-seal fig10-11.png 1,128 × 792; 60 KB
 Evaluating-top-and-fault-seal fig10-12.png 704 × 679; 48 KB
 Evaluating-top-and-fault-seal fig10-13.png 733 × 706; 57 KB
 Evaluating-top-and-fault-seal fig10-14.png 977 × 878; 53 KB
 Evaluating-top-and-fault-seal fig10-15.png 1,141 × 853; 78 KB
 Evaluating-top-and-fault-seal fig10-16.png 1,108 × 828; 76 KB
 Evaluating-top-and-fault-seal fig10-17.png 804 × 1,015; 25 KB
 Evaluating-top-and-fault-seal fig10-18.png 593 × 844; 16 KB
 Evaluating-top-and-fault-seal fig10-19.png 1,675 × 1,173; 1.5 MB
 Evaluating-top-and-fault-seal fig10-2.png 843 × 511; 31 KB
 Evaluating-top-and-fault-seal fig10-21.png 2,011 × 940; 1.72 MB
 Evaluating-top-and-fault-seal fig10-22.png 1,334 × 972; 343 KB
 Evaluating-top-and-fault-seal fig10-23.png 1,137 × 574; 27 KB
 Evaluating-top-and-fault-seal fig10-25.png 1,204 × 675; 28 KB
 Evaluating-top-and-fault-seal fig10-26.png 1,236 × 1,382; 1.17 MB
 Evaluating-top-and-fault-seal fig10-27.png 1,285 × 625; 294 KB
 Evaluating-top-and-fault-seal fig10-29.png 1,681 × 720; 1.43 MB
 Evaluating-top-and-fault-seal fig10-3.png 1,107 × 633; 21 KB
 Evaluating-top-and-fault-seal fig10-30.png 1,983 × 864; 154 KB
 Evaluating-top-and-fault-seal fig10-31.png 1,648 × 1,173; 184 KB
 Evaluating-top-and-fault-seal fig10-32.png 1,106 × 1,267; 1.9 MB
 Evaluating-top-and-fault-seal fig10-33.png 1,685 × 789; 578 KB
 Evaluating-top-and-fault-seal fig10-34.png 878 × 736; 33 KB
 Evaluating-top-and-fault-seal fig10-35.png 1,350 × 728; 384 KB
 Evaluating-top-and-fault-seal fig10-36.png 1,249 × 873; 410 KB
 Evaluating-top-and-fault-seal fig10-37.png 1,399 × 839; 557 KB
 Evaluating-top-and-fault-seal fig10-38.png 1,103 × 969; 18 KB
 Evaluating-top-and-fault-seal fig10-4.png 1,053 × 638; 37 KB
 Evaluating-top-and-fault-seal fig10-40.png 1,248 × 1,505; 747 KB
 Evaluating-top-and-fault-seal fig10-41.png 1,191 × 750; 353 KB
 Evaluating-top-and-fault-seal fig10-42.png 1,514 × 730; 546 KB
 Evaluating-top-and-fault-seal fig10-43.png 874 × 1,568; 700 KB
 Evaluating-top-and-fault-seal fig10-44.png 829 × 1,439; 638 KB
 Evaluating-top-and-fault-seal fig10-45.png 1,270 × 1,454; 95 KB
 Evaluating-top-and-fault-seal fig10-46.png 1,653 × 837; 495 KB
 Evaluating-top-and-fault-seal fig10-47.png 841 × 654; 35 KB
 Evaluating-top-and-fault-seal fig10-48.png 992 × 1,429; 61 KB
 Evaluating-top-and-fault-seal fig10-49.png 1,491 × 861; 61 KB
 Evaluating-top-and-fault-seal fig10-5.png 838 × 497; 16 KB
 Evaluating-top-and-fault-seal fig10-50.png 970 × 1,004; 320 KB
 Evaluating-top-and-fault-seal fig10-51.png 783 × 1,361; 611 KB
 Evaluating-top-and-fault-seal fig10-52.png 1,662 × 680; 344 KB
 Evaluating-top-and-fault-seal fig10-53.png 1,128 × 706; 94 KB
 Evaluating-top-and-fault-seal fig10-54.png 1,524 × 892; 39 KB
 Evaluating-top-and-fault-seal fig10-6.png 1,053 × 639; 39 KB
 Evaluating-top-and-fault-seal fig10-7.png 1,054 × 638; 41 KB
 Evaluating-top-and-fault-seal fig10-8.png 823 × 487; 21 KB
 Evaluating-top-and-fault-seal fig10-9.png 1,298 × 608; 38 KB
 Exploring-for-stratigraphic-traps fig21-1.png 1,502 × 824; 120 KB
 Exploring-for-stratigraphic-traps fig21-10.png 1,356 × 809; 109 KB
 Exploring-for-stratigraphic-traps fig21-11.png 486 × 1,997; 154 KB
 Exploring-for-stratigraphic-traps fig21-12.png 1,636 × 1,045; 478 KB
 Exploring-for-stratigraphic-traps fig21-13.png 1,629 × 1,071; 455 KB
 Exploring-for-stratigraphic-traps fig21-14.png 1,617 × 1,817; 219 KB
 Exploring-for-stratigraphic-traps fig21-15.png 1,635 × 2,017; 1.99 MB
 Exploring-for-stratigraphic-traps fig21-16.png 1,584 × 1,147; 602 KB
 Exploring-for-stratigraphic-traps fig21-17.png 1,421 × 1,570; 476 KB
 Exploring-for-stratigraphic-traps fig21-18.png 1,643 × 602; 95 KB
 Exploring-for-stratigraphic-traps fig21-19.png 1,532 × 1,149; 773 KB
 Exploring-for-stratigraphic-traps fig21-2.png 1,421 × 790; 99 KB
 Exploring-for-stratigraphic-traps fig21-20.png 1,671 × 795; 76 KB
 Exploring-for-stratigraphic-traps fig21-21.png 1,537 × 829; 114 KB
 Exploring-for-stratigraphic-traps fig21-22.png 1,091 × 1,213; 126 KB
 Exploring-for-stratigraphic-traps fig21-23.png 465 × 504; 117 KB
 Exploring-for-stratigraphic-traps fig21-24.png 767 × 488; 34 KB
 Exploring-for-stratigraphic-traps fig21-25.png 1,208 × 529; 44 KB
 Exploring-for-stratigraphic-traps fig21-26.png 1,570 × 1,412; 140 KB
 Exploring-for-stratigraphic-traps fig21-27.png 1,407 × 635; 146 KB
 Exploring-for-stratigraphic-traps fig21-28.png 1,554 × 1,253; 1.16 MB
 Exploring-for-stratigraphic-traps fig21-29.png 476 × 754; 240 KB
 Exploring-for-stratigraphic-traps fig21-3.png 1,184 × 1,741; 635 KB
 Exploring-for-stratigraphic-traps fig21-30.png 1,651 × 1,650; 1.92 MB
 Exploring-for-stratigraphic-traps fig21-31.png 1,633 × 1,509; 483 KB
 Exploring-for-stratigraphic-traps fig21-32.png 996 × 1,937; 402 KB
 Exploring-for-stratigraphic-traps fig21-33.png 1,923 × 1,131; 241 KB
 Exploring-for-stratigraphic-traps fig21-34.png 1,660 × 1,036; 169 KB
 Exploring-for-stratigraphic-traps fig21-35.png 1,658 × 586; 61 KB
 Exploring-for-stratigraphic-traps fig21-36.png 1,635 × 1,586; 662 KB
 Exploring-for-stratigraphic-traps fig21-37.png 1,607 × 434; 73 KB
 Exploring-for-stratigraphic-traps fig21-39.png 1,089 × 1,889; 630 KB
 Exploring-for-stratigraphic-traps fig21-4.png 1,514 × 1,669; 1.26 MB
 Exploring-for-stratigraphic-traps fig21-40.png 1,568 × 1,329; 408 KB
 Exploring-for-stratigraphic-traps fig21-41.png 1,241 × 1,877; 555 KB
 Exploring-for-stratigraphic-traps fig21-42.png 1,089 × 632; 84 KB
 Exploring-for-stratigraphic-traps fig21-5.png 1,157 × 792; 274 KB
 Exploring-for-stratigraphic-traps fig21-6.png 1,518 × 1,585; 193 KB
 Exploring-for-stratigraphic-traps fig21-7.png 1,510 × 1,029; 326 KB
 Exploring-for-stratigraphic-traps fig21-8.png 1,497 × 522; 179 KB
 Exploring-for-stratigraphic-traps fig21-9.png 1,638 × 713; 625 KB
 Exploring-for-structural-traps fig20-1.png 1,595 × 2,035; 656 KB
 Exploring-for-structural-traps fig20-10.png 1,584 × 903; 256 KB
 Exploring-for-structural-traps fig20-11.png 2,012 × 1,163; 894 KB
 Exploring-for-structural-traps fig20-12.png 1,291 × 898; 986 KB
 Exploring-for-structural-traps fig20-13.png 1,573 × 875; 361 KB
 Exploring-for-structural-traps fig20-14.png 1,685 × 1,159; 1.43 MB
 Exploring-for-structural-traps fig20-15.png 1,478 × 1,995; 263 KB
 Exploring-for-structural-traps fig20-17.png 1,685 × 1,069; 1.47 MB
 Exploring-for-structural-traps fig20-18.png 1,551 × 895; 112 KB
 Exploring-for-structural-traps fig20-2.png 1,690 × 1,706; 434 KB
 Exploring-for-structural-traps fig20-3.png 1,592 × 2,066; 287 KB
 Exploring-for-structural-traps fig20-4.png 1,671 × 1,286; 141 KB
 Exploring-for-structural-traps fig20-5.png 1,062 × 1,519; 396 KB
 Exploring-for-structural-traps fig20-7.png 1,130 × 2,057; 215 KB
 Exploring-for-structural-traps fig20-8.png 1,536 × 2,154; 601 KB
 Exploring-for-structural-traps fig20-9.png 1,275 × 694; 519 KB
 Interpreting-3-d-seismic-data fig13-1.png 1,276 × 2,005; 1.5 MB
 Interpreting-3-d-seismic-data fig13-10.png 1,213 × 1,057; 870 KB
 Interpreting-3-d-seismic-data fig13-11.png 1,203 × 1,016; 739 KB
 Interpreting-3-d-seismic-data fig13-12.png 1,200 × 949; 1.12 MB
 Interpreting-3-d-seismic-data fig13-2.png 1,682 × 1,119; 1.48 MB
 Interpreting-3-d-seismic-data fig13-3.png 1,495 × 932; 1.88 MB
 Interpreting-3-d-seismic-data fig13-4.png 1,672 × 809; 1.04 MB
 Interpreting-3-d-seismic-data fig13-5.png 1,124 × 743; 177 KB
 Interpreting-3-d-seismic-data fig13-6.png 1,601 × 869; 400 KB
 Interpreting-3-d-seismic-data fig13-7.png 1,687 × 542; 499 KB
 Interpreting-3-d-seismic-data fig13-8.png 1,669 × 977; 1,006 KB
 Interpreting-3-d-seismic-data fig13-9.png 1,652 × 876; 1.37 MB
 Interpreting-seismic-data fig12-1.png 1,558 × 642; 56 KB
 Interpreting-seismic-data fig12-10.png 1,677 × 858; 1.12 MB
 Interpreting-seismic-data fig12-11.png 1,438 × 1,761; 883 KB
 Interpreting-seismic-data fig12-12.png 1,651 × 1,287; 383 KB
 Interpreting-seismic-data fig12-13.png 1,547 × 657; 229 KB
 Interpreting-seismic-data fig12-14.png 1,982 × 514; 559 KB
 Interpreting-seismic-data fig12-15.png 1,556 × 705; 68 KB
 Interpreting-seismic-data fig12-16.png 1,640 × 695; 576 KB
 Interpreting-seismic-data fig12-2.png 1,676 × 671; 109 KB
 Interpreting-seismic-data fig12-3.png 1,664 × 852; 483 KB
 Interpreting-seismic-data fig12-4.png 1,628 × 546; 73 KB
 Interpreting-seismic-data fig12-5.png 1,651 × 788; 503 KB
 Interpreting-seismic-data fig12-6.png 1,262 × 920; 641 KB
 Interpreting-seismic-data fig12-7.png 1,430 × 1,789; 478 KB
 Interpreting-seismic-data fig12-8.png 1,601 × 1,294; 566 KB
 Interpreting-seismic-data fig12-9.png 1,614 × 786; 50 KB
 Predicting-preservation-and-destruction-of-accumulations fig11-1.png 1,618 × 388; 247 KB
 Predicting-preservation-and-destruction-of-accumulations fig11-2.png 1,663 × 429; 74 KB
 Predicting-preservation-and-destruction-of-accumulations fig11-3.png 1,071 × 1,213; 130 KB
 Predicting-preservation-and-destruction-of-accumulations fig11-4.png 1,666 × 570; 80 KB
 Predicting-reservoir-system-quality-and-performance fig9-1.png 1,684 × 602; 55 KB
 Predicting-reservoir-system-quality-and-performance fig9-10.png 847 × 761; 203 KB
 Predicting-reservoir-system-quality-and-performance fig9-100.png 1,622 × 1,148; 174 KB


